Pages

Thursday, May 29, 2014

Lemony Shrimp Pasta with Spinach and Tomatoes

I have made this recipe several times over the last few months and every time it's a hit. Now that I'm a mom, easy and fast weeknight meals have become even more important for our household. So we can avoid the nights where we don't eat until late after putting baby girl to sleep, dinner that takes a very short amount of time to put together makes evenings all the better!

 As is my favorite, this meal is very customizable. It's pretty much a shrimp scampi, so if you like the lemon sauce, you can remove the tomatoes and spinach to make it more true to a scampi. Who needs Olive Garden when you can make something even better at home?


Lemony Shrimp Pasta with Spinach and Tomatoes
(adapted from Annie's Eats)

Ingredients:
3/4 lb. linguine
4 tbs. butter
2 tbs. olive oil
2-3 tomatoes, diced
1 lb. large shrimp, peeled and deveined
4 cloves garlic, minced
1/2 tsp. salt
1/4 tsp. pepper
1 cup spinach
juice and zest of 1 lemon

Directions:
  1. Bring a pot of salted water to a boil. Cook pasta according to package directions.
  2. While pasta is cooking, melt butter and olive oil in a large skillet. Add garlic and saute for about 1 minute, just until golden and fragrant!
  3. Add the tomatoes to the pan and cook until they start to break down, then distribute shrimp evenly around the pan. 
  4. Salt and pepper the shrimp and flip them over once you start to see them turning pink on the bottom.
  5. Once shrimp are flipped, add the spinach to the pan and stir just until it starts to wilt and shrimp are fully pink and opaque. 
  6. Remove pan from heat, add the lemon juice and zest, and stir to combine. Serve over cooked linguine with a little freshly grated parmesan on top!

Yes, I do exist.

So, this is probably going to surprise everyone but believe it or not, I was the one who started this blog in the first place. I just haven't posted anything in a long time and Rebecca has taken over most of the blogging. But I have decided that maybe I should start contributing more to its content and add a second perspective to things.
Be prepared those of you who are used to getting a lot of nice photos, words being spelled correctly, and other things along those lines, you'll probably not get any of that from me. It'll probably just be random thoughts about whatever it is that I'm thinking about on my daily commutes on the train to and from work.
But to start of with I thought I'd start a series of "Rules". These rules are what I think everyone should know and already do but they aren't following them. And if people would only act according to these rules it would make my life better. It may not make your life better but these are my rules so of course they are going to be biased in my favor. :) So here we go:
Rule #1
I am always right.
Until I learn something new and decide to change my mind. But even then I was right at the time and my new decision is right too.

Wednesday, May 28, 2014

Mongolian Beef

Michael and I have really been working hard at perfecting our "Asian" cooking lately. And by that I mean, getting better at making take-out quality foods to satisfy such cravings so we don't have to order takeout so often. We LOVE any type of Asian foods and tend to crave them fairly often as they are just so darn good. I'm not gonna lie...we're pretty big fans of Panda Express. But, who needs to spend all that money when the same type of dishes can be made at home for less money and the assurance that MSG is not included?

This recipe is just one example of such a meal for a weeknight dinner. The process may seem laborious at first, but once you get the whole coat-meat-in-cornstarch-then fry-in-oil thing down, it's actually a pretty fast process and you can have a yummy dinner on your table in no time.

We really love the flavor of the beef, especially as the sauce is so simple and just requires a few ingredients mixed together beforehand. This is actually a copycat recipe for P.F. Chang's, so if you're a fan of that restaurant (and I am), then you'll be pleasantly surprised with the taste. Enjoy!

Mongolian Beef
(adapted from Six Sisters Stuff)

Ingredients:
2 tsp. vegetable oil
1/2 tsp. ginger, minced

1 tbs. garlic, minced

1/2 cup soy sauce
 (low-sodium)
1/2 cup water

3/4  cup dark brown sugar

vegetable oil, for frying (about 1 cup)

1 lb. flank steak (or steak of your choice)

1/4 cup cornstarch

Directions:

Sauce:

  1. Heat 2 tsp. of vegetable oil in a medium saucepan over medium/low heat. 
  2. Add ginger and garlic to the pan and quickly add the soy sauce and water before the garlic scorches.
 
  3. Dissolve the brown sugar in the sauce. 
  4. Then increase the heat to medium and boil the sauce for 2-3 minutes or until the sauce thickens.
  5. Remove it from the heat and set aside.

Beef:

  1. Slice the steak against the grain into bite-size pieces and dip into cornstarch to apply a very thin dusting to all sides. Let the beef sit for about 10 minutes so that the cornstarch sticks.  
  2. As the beef sits, heat up one cup of oil in a wok or deep skillet (you want the beef to be mostly covered with oil). Heat the oil over medium heat until it's nice and hot, but not smoking. 
  3. Add the beef to the oil and sauté until brown. Stir the meat around a little so that it cooks evenly.
  4. Remove beef from skillet and place onto paper towel lined plate.  Dab excess oil off meat with  the paper towel and add to medium saucepan with the sauce in it.  
  5. Put the pan back on the oven over medium/low heat and let sauce simmer until warm. Serve over rice.

Notes
- We really prefer low-sodium soy sauce in this recipe as it is just too salty when made with the regular soy sauce.
- You can top the finished beef with sliced green onions, for some extra flavor and color.

Wednesday, May 21, 2014

Rule #2

When driving a car, if you can't see the full circle of the sun, turn your headlights on.
This covers every situation, cloudy days, rain, snow, dusk, dawn, anytime you can't see the sun; it's time to turn your headlights on. Headlights not only help you to see but they help other people to see you.

Saucy Pulled Pork Sandwiches

 Here's a perfect and VERY EASY go-to recipe for the upcoming Memorial Day weekend. Who doesn't love some good barbecue, especially when it involves as little work as possible? Thank you slow cookers for helping people all around the country spend less time in the kitchen, so they can enjoy more time with family!

These pulled pork sandwiches are so yummy! I know I use that word a lot, but it's true. I've made pulled pork before with just using a basic BBQ sauce, but adding all the extra spices really changed the flavor and added so much depth to the final product. You definitely get a little kick from the paprika and chili powder, which contrasts the bit of sweet from the brown sugar.

I had some sauce dripping down my chin and I MAY or may not have licked it off with my tongue. 
It tastes that good.

So, make these this weekend and serve them alongside some homemade sweet potato fries, a grilled salad, banana pudding, and ice cream. Sounds like a perfect way to enjoy the nice weather and a fun holiday!


Saucy Pulled Pork Sandwiches
(adapted from How Sweet Eats)

Ingredients:
1 (5 to 6 pound) pork roast

1/4 cup brown sugar

1 1/2 tsp. paprika
1 tsp. garlic powder

1 tsp. salt

1 tsp. black pepper

1/2 tsp. chili powder
1/2 tsp. onion powder
1 tbs. Worcestershire sauce
1-2 cups of your favorite BBQ sauce (we used Sweet Baby Ray's Honey Chipotle)

Directions:
  1. Place pork roast into a slow cooker.
  2. In a bowl, combine the rest of the ingredients and mix well. Pour over pork roast.
  3. Cook on HIGH for 4 hours or LOW for 6-8 hours, or until meat falls apart between two forks.
  4. Serve on top of your favorite hamburger-style buns!

Monday, May 12, 2014

3 months...1/4 of a year!

 Is that not the most beautiful picture you've ever seen? And the most beautiful baby girl? Okay, I'm totally biased. But seriously...she's gorgeous. Inside and out. 

Needless to say, we love our sweet girl. In the past month she has just grown so much and reached so many milestones and we are loving seeing her start to figure things out. Every new stage of her development is my favorite.

Here are some pictures to document how she's grown. Notice the chubby double chin and chunky thighs and arms!


Jessica has started putting her little hands and fingers together like this. When she rubs them together it's almost like she's plotting or scheming. Now what she'd scheme about is to be determined. Probably when she'll surprise me with the next blowout diaper...!


And, at last...a silly one for posterity's sake!


Exciting updates:
Jessica weighs about 15 lbs now (we're guessing).
She is a talker and loves to do this all day long, or when she wakes up, or when she falls asleep.
She continues to be a great sleeper (11-12 hours baby!), with the exception of a few nights a couple weeks ago when she had her first diaper rash and woke once about 5 am.
Her first diaper rash...yay! It cleared up after a few days.
Jessica is starting to grab things more and put them to her mouth.
We're getting some good giggles out of her and mommy makes a fool of herself to just try and make her laugh.
Jessica smiles ALL the time, especially when she sees her mommy or daddy. 
Michael and I love to fight over who gets her from a nap because as soon as she sees us, this big gummy grin spreads across her face!
Jessica has started to take a longer time to nurse because she'll stop partway through and "talk" to me for about 5-10 minutes. 
She had her first bout of cradle cap that we nixed with some olive oil and a few good hairwashes.
She is getting very good at tummy time and is up on her tiptoes, but just can't get all the way rolled over. She's very close though!

Friday, May 09, 2014

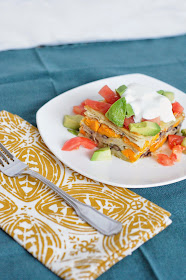
Stacked Sweet Potato Enchiladas

Can I just say, once again, how much I love my camera? I feel like a real food photographer with the quality of photos I'm getting out of it! It's so much fun :) 

On to the recipe...

This was a Pinterest success. And we all know how many Pinterest fails there are out there, so it is such a relief when things go well. The original recipe called for filling and rolling the enchiladas, but I'm kinda lazy sometimes and prefer the stacked method. It's faster and just looks so darn pretty in all the layers!

 
You'll love how easy and yummy this recipe is for a weeknight dinner. I'm a huge fan of the corn tortillas, as I feel like they hold up better and don't get as soggy as flour tortillas in this instance. Also, this recipe is completely adaptable to whatever you want to throw in or take out. I'm currently on the outs with onions as a result of baby gassiness and nursing, so I eliminated those. But feel free to customize to your whims!

Stacked Sweet Potato Enchiladas
(adapted from Damn Delicious)

Ingredients:
1 can green enchilada sauce
2 sweet potatoes, peeled and diced
1 can black beans, drained and rinsed
1 (4.5-ounce) can green chiles
3 tbs. fresh cilantro leaves, chopped
1 tsp. chili powder
1/2 tsp. garlic powder
1/2 tsp. cumin
Salt and pepper, to taste
2 cups shredded Monterey Jack cheese, divided
24 6-inch corn tortillas
1 avocado, diced
1 tomato, diced
Sour cream

Instructions:
  1. Preheat oven to 400 degrees Fahrenheit. Pour 1/2 can of enchilada sauce in the bottom of a 9×13 baking dish; set aside.
  2. In a large pot of boiling water, cook sweet potatoes until tender, about 12-15 minutes; drain well.
  3. In a large bowl, combine sweet potatoes, black beans, green chiles, cilantro, chili and garlic powder, cumin, salt and pepper, to taste.
  4. To assemble the enchiladas, lay about 8 tortillas on bottom of pan, overlapping one another. Spoon 1/2 sweet potato mixture on top, then sprinkle with about 1/3 the shredded cheese. Repeat with one more layer, then top with more tortillas, and the remaining enchilada sauce and cheese.
  5. Place into oven and bake until bubbly and the cheese is beginning to brown, about 30 minutes.
  6. Serve immediately, garnished with avocado and tomato, and topped with sour cream, if desired.
Yields: about 6 servings